Multi-Container Setup
In this user guide, we provide step by step instructions for orchestration of multi-container co-simulation for an existing OEDISI project.
Multi-container co-simulations requires containers to communicate with other containers participating in the co-simulation federation. This is achieved via a REST API interface. This interface allows users to start / stop co-simulation runs, upload profiles and models and download co-simulation results once the simulation is complete.
This means, any new container needs to have a REST API implementation to be able to communicate with participating containers.
Once this initial step is complete, the simulation can be setup using the following step by step process.
Step 0 - Requirements for a multi-container setup
User has two main responsibilities when integrating a new container (see https://github.com/openEDI/oedisi-example/tree/main/wls_federate).
Implementation of a REST API interface for the algorithm. Three required endpoints are:
GET (“/”) : This root endpoint is used for container health Check
POST (“/configure”): This endpoint takes Component Structure as JSON payload and is used to configure the federate
POST (“/run”) : This endpoint takes broker config JSON as payload and starts the federate (connects to the broker and takes federate to HELICS execution mode)
A minimal example is provided below
from fastapi import FastAPI, BackgroundTasks, HTTPException
from state_estimator_federate import run_simulator
from oedisi.types.common import BrokerConfig
from fastapi.responses import JSONResponse
import traceback
import uvicorn
import socket
import json
import sys
import os

from oedisi.componentframework.system_configuration import ComponentStruct
from oedisi.types.common import ServerReply, HealthCheck, DefaultFileNames

app = FastAPI()


@app.get("/")
def read_root():
    hostname = socket.gethostname()
    host_ip = socket.gethostbyname(hostname)
    response = HealthCheck(
        hostname=hostname,
        host_ip=host_ip
    ).dict()
    return JSONResponse(response, 200)


@app.post("/run")
async def run_model(broker_config: BrokerConfig, background_tasks: BackgroundTasks):
    print(broker_config)
    try:
        background_tasks.add_task(run_simulator, broker_config)
        response = ServerReply(
            detail="Task sucessfully added."
        ).dict()
        return JSONResponse(response, 200)
    except Exception as e:
        err = traceback.format_exc()
        HTTPException(500, str(err))


@app.post("/configure")
async def configure(component_struct:ComponentStruct):
    component = component_struct.component
    params = component.parameters
    params["name"] = component.name
    links = {}
    for link in component_struct.links:
        links[link.target_port] = f"{link.source}/{link.source_port}"
    json.dump(links , open(DefaultFileNames.INPUT_MAPPING.value, "w"))
    json.dump(params , open(DefaultFileNames.STATIC_INPUTS.value, "w"))
    response = ServerReply(
            detail = f"Sucessfully updated configuration files."
        ).dict()
    return JSONResponse(response, 200)

if __name__ == "__main__":
    uvicorn.run(app, host="0.0.0.0", port=int(os.environ['PORT']))
For Python code bases, create a requirements.txt file with all required dependencies for the algorithm being integrated. A docker file is generated automatically during the build process
For other languages, create a docker file with all required dependencies setup.
Update the Wiring Diagram. Make sure the connections are valid. Ensure a unique container port and hostname is assigned to each ‘component’ in the wiring diagram (see example below).
{
    "name": "recorder_voltage_real",
    "type": "Recorder",
    "host": "recorder-voltage-real",
    "container_port": 5679,
    "parameters": {
        "feather_filename": "voltage_real.feather",
        "csv_filename": "voltage_real.csv"
    }
}
Step 1 - Building Docker-Compose and Kubernetes deployment files
Deployment files for Docker-Compose and Kubernetes are built using the following CLI command.

Step 2a - Running containers using Docker-Compose
OEDISI supports multi-container orchestration via Docker-Compose and Kubernetes. Docker-Compose is well suited for single machine multi-container co-simulation run.
The image below provides details on the auto-generate Docker-Compose file.

Containers can be orchestrated using Docker compose using the following CLI command. Make sure Docker deamon is running before running the CLI command below

Step 2b - Running containers using Kubernetes
Kubernetes will enable multi-machine cloud orchestration of OEDISI co-simulations. This is well suited for private algorithm use case. Make sure Kubernetes cluster is running before running the CLI command below

Containers can be orchestrated using Kubernetes using the following CLI command

Step 3 - Running containers using Kubernetes
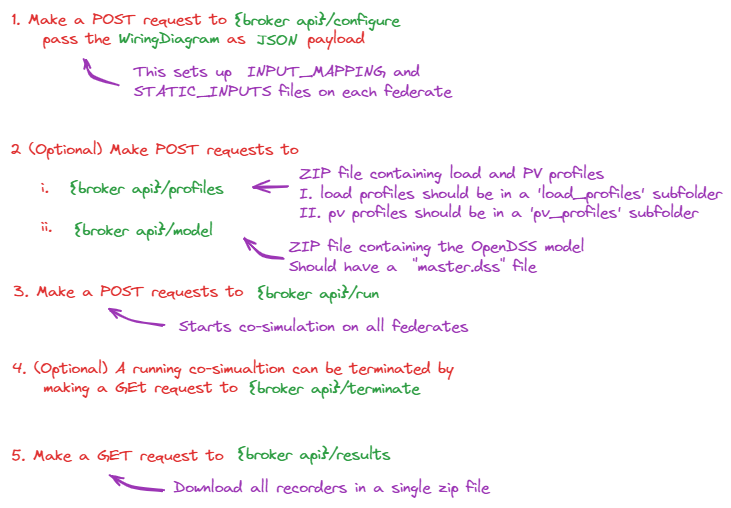
In this multi-container implementation, the ‘Broker’ container is the sole container the user is expected to interface with. The API endpoints (listed above) enables the broker federate to users to setup and run co-simulations
Docker Compose Orchestration - Video tutorial
Kubernetes Orchestration - Video tutorial
FAQs
If build is not using local changes, then try docker compose build –no-cache.
If using M1 or M2, HELICS in Docker requires x86 emulation with by using export DOCKER_DEFAULT_PLATFORM=linux/amd64